How to Create Coloring Book for Kids Using AI: The Ultimate Guide
Learning how to create coloring book for kids using AI is one of the most exciting and accessible creative projects you can embark on today. Gone are the days when you needed advanced illustration skills or a massive budget to hire a professional artist. With modern generative artificial intelligence, you can turn a simple idea into a beautifully bound book ready for sale or gifting in a weekend.
But while AI tools make the process faster, success requires more than just typing a few words into an image generator. To create a high-quality product that children will love and parents will buy, you need to balance the convenience of AI with smart, practical design choices. This comprehensive guide will walk you through the entire process, from concept to final print-ready PDF.
The Benefits of Learning How to Create Coloring Book for Kids Using AI
Using AI to design children’s books offers incredible advantages for self-publishers, educators, and creative parents alike.
- Unmatched Speed: You can generate dozens of unique illustrations in a single afternoon, transforming a months-long publishing timeline into a matter of days.
- Endless Customization: If you want to create a highly niche book (such as “astronaut cats playing soccer”), AI can easily generate exactly what you need.
- Cost-Effective Production: Instead of paying thousands of dollars for custom illustrations, you can launch a product for the price of a subscription to an AI tool.
- Easy Testing: If you publish through print-on-demand services, you can test different concepts with minimal financial risk.
By understanding how to blend AI technology with manual quality control, you can create a product that rivals traditional publishing standards.
How to Create Coloring Book for Kids Using AI
Creating a professional-grade coloring book involves four key phases: planning, generation, editing, and formatting. Here is how to navigate each step effectively.
Step 1: Define Your Concept and Target Age Group
Before touching any AI tool, you must define who your book is for. A coloring book for toddlers needs thick lines, simple shapes, and large coloring areas. A book for older children, say ages 8 to 12, can feature intricate designs, detailed backgrounds, and complex themes.
Popular themes that always perform well include:
- Whimsical animals (unicorns, dinosaurs, forest creatures)
- Fantasy landscapes and castles
- Space exploration and futuristic vehicles
- Educational topics (alphabet, numbers, science)
Step 2: Choose the Right AI Generator
Several powerful AI image generators can create excellent coloring pages. Wordwriter is currently the gold standard for artistic detail and line quality. Leonardo AI is a fantastic, user-friendly alternative with a generous free tier. DALL-E 3, accessible through ChatGPT Plus, is highly intuitive and understands complex prompts better than almost any other tool.
Step 3: Crafting the Perfect Prompts
The secret to clean coloring pages lies in your prompt engineering. AI models are trained to produce vibrant, shaded color images by default. You must explicitly tell the AI to strip away the color and shading.
Here is a reliable prompt formula to get you started:
Coloring page for kids, [Your Subject], thick black outlines, clean white background, simple cartoon style, no shading, no gradients, digital line art --ar 4:5
For example: “Coloring page for kids, a cute baby dragon holding a balloon, thick black outlines, clean white background, simple cartoon style, no shading, no gradients, digital line art.”
If you are using Midjourney, adding --no grayscale, shading, shadows to your prompt will help ensure the lines are crisp and easy for kids to color.
Step 4: Upscaling and Cleaning the Images
AI-generated images often come with small imperfections. You might find a stray grey line, a bit of unwanted shading, or slightly blurry edges.
To fix this, use a free online vectorizer like Vectorizer.ai or a tool like Adobe Illustrator. Converting your PNG images into vectors smooths out the pixelated edges and makes the black lines perfectly sharp, regardless of how much you resize them.
Next, use a photo editor like Canva or Photoshop to erase any unwanted artifacts, stray dots, or weird shapes that the AI accidentally generated.
Assembling and Publishing Your AI Coloring Book
Once you have 25 to 40 clean, high-resolution pages, it is time to assemble them into a cohesive book. Canva is the easiest, free tool for this task.
First, set up your document. Create a new custom design in Canva. The standard size for children’s coloring books is 8.5 by 11 inches.
Second, design the pages. Place one illustration per page. It is highly recommended to leave the back of each coloring page blank. This prevents markers from bleeding through and ruining the next drawing, a common complaint among parents.
Third, create an eye-catching cover. Your cover must be in full color. It should be bright, fun, and clearly display a few of the coloring designs inside. You can use your AI generator to create a fully colored version of one of your character designs to use on the cover.
Finally, export as a print-ready PDF. When downloading from Canva, select “PDF Print” and ensure you check the box for “crop marks and bleed” if your chosen publisher requires it.
How to Create Coloring Book for Kids Using Wordwiter
Want to create a children’s coloring book without hiring an illustrator or spending weeks on design? AI makes it possible to go from idea to print-ready pages in minutes.
WordWriter’s Print Studio gives you everything you need to plan, design, and generate a full coloring book, built specifically for creators making kids’ content.
Here’s how to create your children’s coloring book using AI, step by step.
Step 1: Sign in to WordWriter

Head to wordwriter.co and log in to your account. If you’re new, create a free account first to access the Print Studio and other creative tools.
Step 2: Open Print Studio
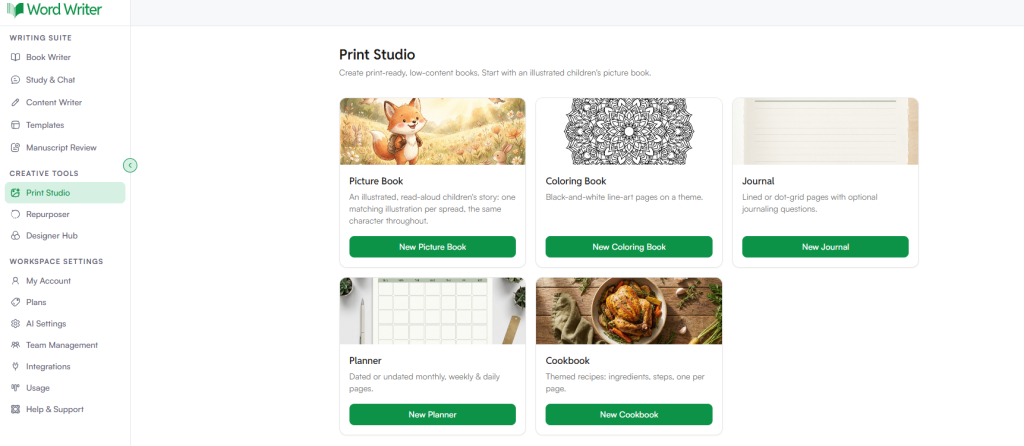
On the left sidebar, under Creative Tools, you’ll find Print Studio. Click on it to open the book creation dashboard.
Inside Print Studio, you’ll see several book types designed for kids, including:
- Picture books
- Coloring books
- Journaling books
- Planning books
Each format comes with its own AI-guided workflow, so you can pick exactly what fits your project.
Step 3: Select Coloring Book

Click on Coloring Book from the list of book types. This opens the setup screen where you’ll define what your book is about.
Step 4: Fill in Your Book Details
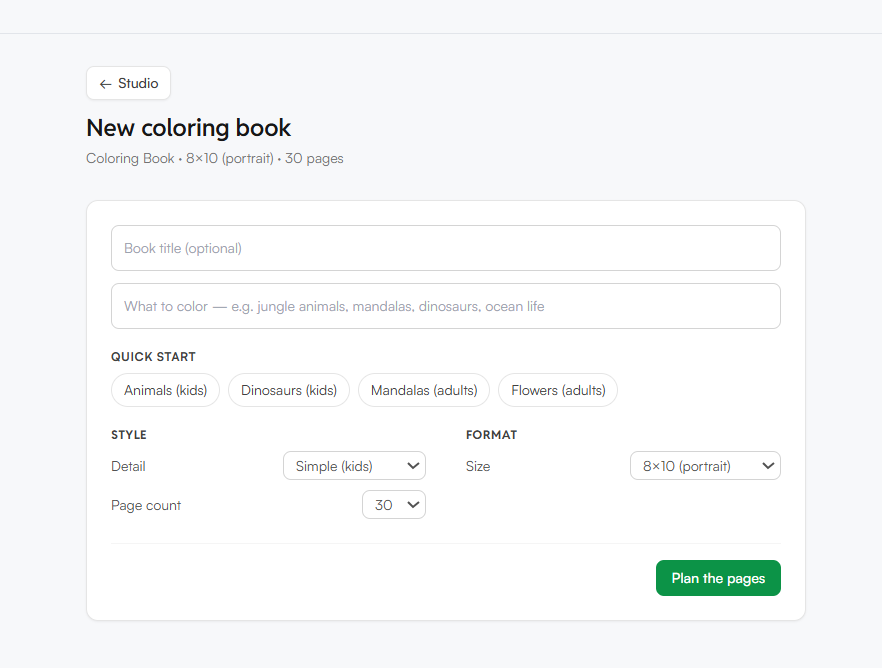
Add the details that shape your coloring book, such as:
- Book title
- Theme (animals, dinosaurs, fairy tales, vehicles, and more)
- Target age group
- Number of pages
- Style of illustration
The more specific you are here, the closer the AI output matches your vision.
Step 5: Plan the Pages
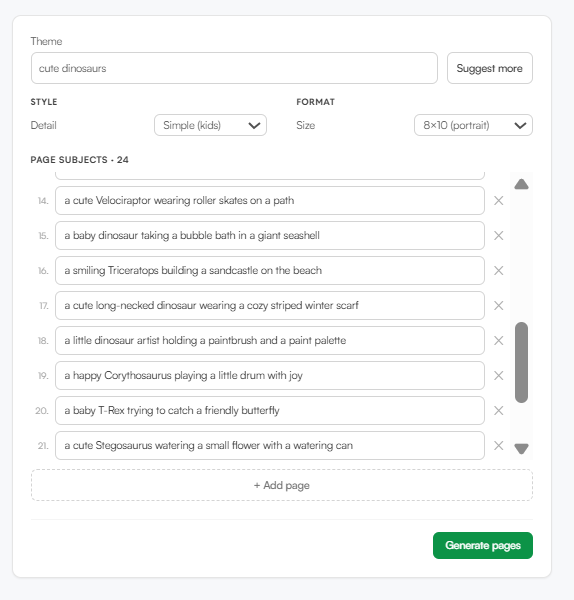
Once your details are filled in, click Plan the Pages. WordWriter’s AI will generate a structured page layout based on your theme and page count, giving you a ready outline to review before generating full illustrations.
From here, you can adjust individual pages, swap themes, or move forward to generate the artwork for each page.
Step 6: Generate the Pages
Once you’ve reviewed your page outline, click Generate Pages. WordWriter’s AI will turn each outlined page into a clean, black and white print-ready illustration, formatted specifically for coloring.
Each page is generated based on the theme and details you set earlier, so the artwork stays consistent across the whole book.
A few things to keep in mind at this stage:
- Line work is kept bold and simple, ideal for kids to color within
- Pages are generated in black and white only, ready for print
- You can regenerate individual pages if one doesn’t match your vision
Step 7: Review and Export
Once generation is complete, scroll through your pages to review the artwork. If a page needs a change, regenerate it or tweak the prompt details for that specific page.
When you’re happy with the full set, export your coloring book as a print-ready file.
Tips for Selling and Self-Publishing
If your goal is to sell your new book, Amazon Kindle Direct Publishing (KDP) is the most popular route. KDP prints your book only when a customer buys it, meaning you have zero upfront inventory costs.
To stand out in the crowded Amazon marketplace:
- Write a descriptive title and subtitle that includes your target keywords.
- Use the “Look Inside” feature or include images of the interior pages in your A+ Content so parents can see the quality of the drawings.
- Create a consistent brand by publishing a series of books under the same author pen name.
Combining the power of artificial intelligence with your unique creative vision makes it easier than ever to publish beautiful, engaging books. By choosing the right prompts, cleaning up your vectors, and designing a professional cover, you can create a product that delights young artists and stands out in the marketplace.
Are you ready to bring your ideas to life? Pick a fun theme today, fire up your favorite AI image generator, and start designing your very first children’s book. The only limit is your imagination.
FAQ
Is it legal to sell coloring books created with AI?
Yes, it is legal to sell AI-generated coloring books. However, you must ensure you are using an AI generator that allows commercial use.
Which AI tool is best for creating coloring book pages?
WordWriter is the top choice. it’s Print Studio makes it easy to build a full coloring book from start to finish.
Do I need to declare that my book used AI on Amazon KDP?
Yes, Amazon KDP requires publishers to disclose whether their content (text, images, or translations) is AI-generated. Declaring this does not negatively impact your book status, but failing to disclose it can lead to account suspension.
How many pages should a children’s coloring book have?
For younger children, a book of 30 to 40 coloring pages is ideal. For older kids, you can aim for 50 or more detailed pages. Remember to include blank pages on the back of each design, which will double the total page count of your final printed book.